Advanced Stripe Payments Engine WordPress
Advanced Stripe Payments Engine WordPress integrates your WordPress site with Stripe’s easy to use credit card processing system, allowing you to easily accept contributions, donations and payments via credit card. Stripe allows you to easily process cards on your site with full PCI compliance and brings an exciting new take to payment prcessing, and our plugin allows you an easy way to bolt-on a solution in just under 5 minutes! Simply install the plugin, enter your API keys (available under your Stripe backend) and be immediately on your way toward accepting payments.
Features of Advanced Stripe Payments Engine WordPress:
Dynamic, drag-and-drop checkout form builder. Add or remove payment elements, collect money or subscriptions, collect reservation or registration data simply!
Easy theming and skinning. Comes with two themes, but you can build infinite amounts and quickly deploy to your customers.
Integration with WordPress Users. Create a new user with each successful donation or payment; use with other plugins to build a fully custom site!
Recurring subscriptions. Our plugin works with Stripe’s innovative approach to subscriptions to integrate recurring contributions on a monthly or annual basis, of any amount.
Database tracking. Track payments, ban IPs and email your customer all from the WordPress backend. No need to enter Stripe ever!
Email receipts. Receive an email receipt as an administrator and send custom receipts to your clients.
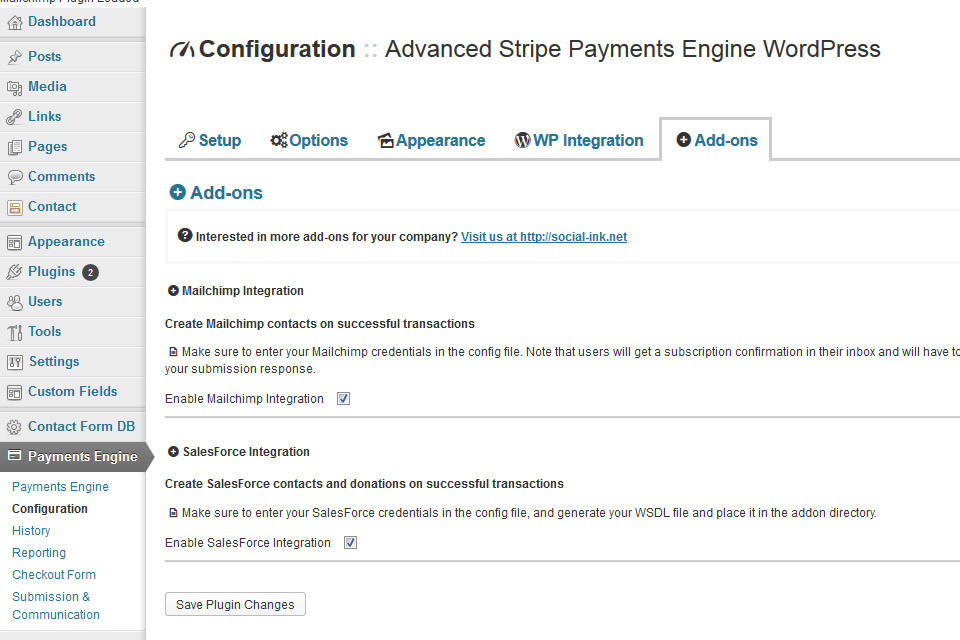
Available Salesforce and Mailchimp integration. With these add-ons, you can create a customer and donation “object” in Salesforce or insert somebody who paid directly into Mailchimp, all automatically.
Want something you don’t see? Email us! We do custom plugins at affordable rates.

Welcome Screen
Easy add-ons
Themes and skinning!
Easy Stripe Setup
Easy custom responses, both to submission and via email.
More form builder example
Build a form to collect money in 5 minutes!
The frontend of the monthly example.

Custom Forms
Quick and simple overview history, with refunds and email receipt sending
Reporting and Statistics – export to CSV
DOCS
Welcome to the Advanced Stripe Payments Engine WordPress documentation! Below we’ll walk you through using the plugin
Configuration
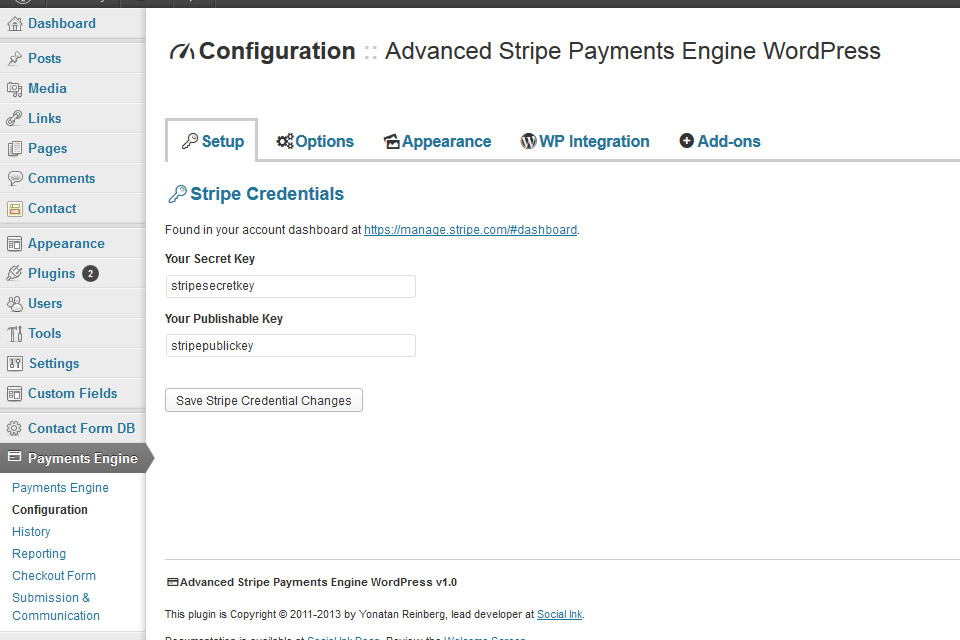
After activation, head over to your options page to enter your Stripe information in the first tab, marked Setup. You’ll need to enter your publishable and private key; the latter will be securely stored in the system to coordinate the transaction with Stripe.
The second tab, Options, contains site options; here you may choose to enable email confirmation to yourself, the administrator of the site, and whether to send an email to the user after a successful transaction. You’ll be able to fully edit the customer email in just a little bit. The final option allows you to accept international contributions by doing two things: opening a country field in your billing details, and making zip code not a required billing detail. Please note that depending on your stripe.com settings, you may still not be able to accept international contributions.
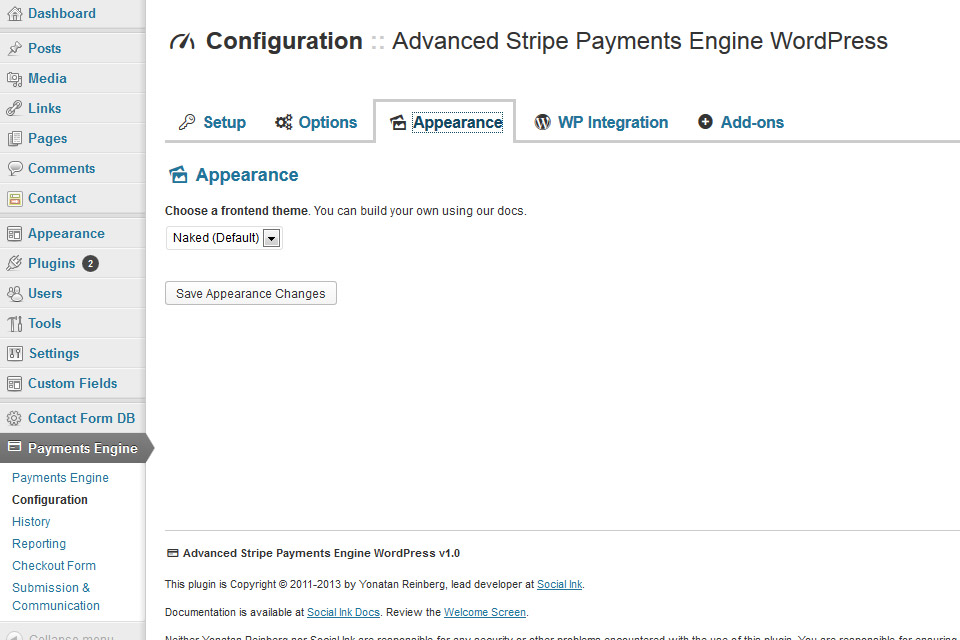
The third tab, Appearance, will allow you to select your theme. We’ve included a few themes to start you out with. Naked is popular with our clients because it fits neatly into your current site styles. Check out the other themes to see if you like them!
TIP: You may create your own styles at any time by overwriting the CSS in your WordPress theme settings, or create a completely new theme for Advanced Stripe Payments Engine! Simple create a css file in your plugin’s /css/themes/ directory, with the first line containing the following comment: /* THEME: <themename> */ with themename replaced. Check out the default themes for more info.
The WP Integration tab allows you to create a new WP user with each successful payment. You may want this for sending out email blasts, for example, or integrating with other plugins like BuddyPress. Watch this space for future customizations!
The final tab, Add-ons, lists the other optional add-ons for Advanced Stripe Payments Engine, such as our own Salesforce integration or whatever you may cook up. Check that add-ons documentation for more information or see below for information on creating your own add-on!
Customizing your Form
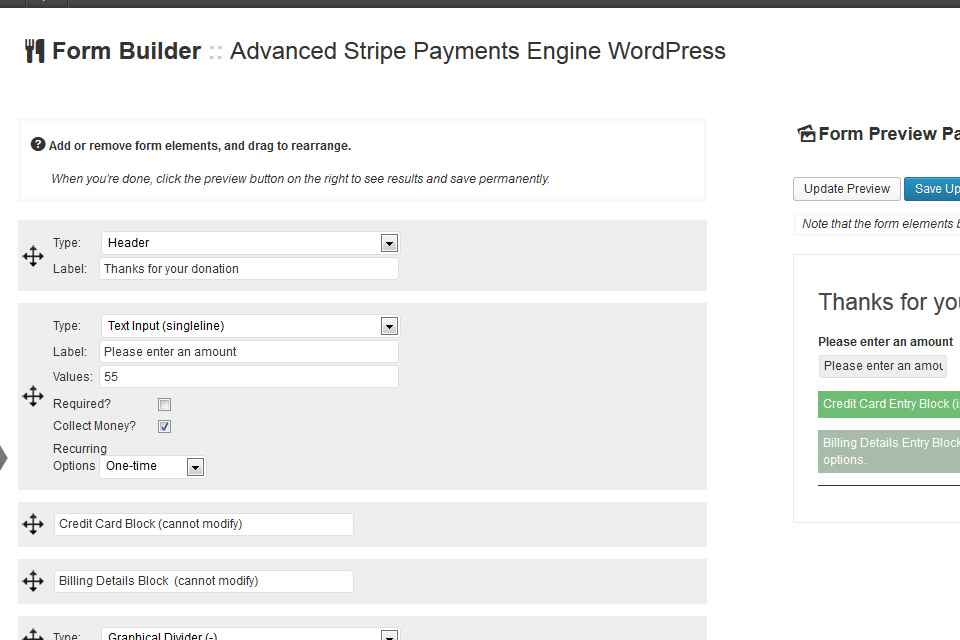
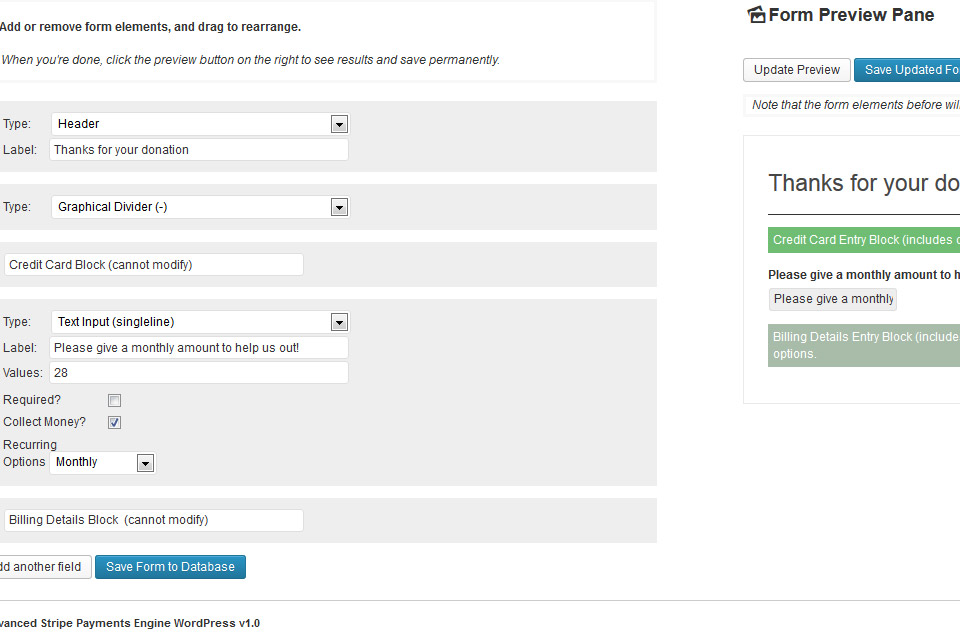
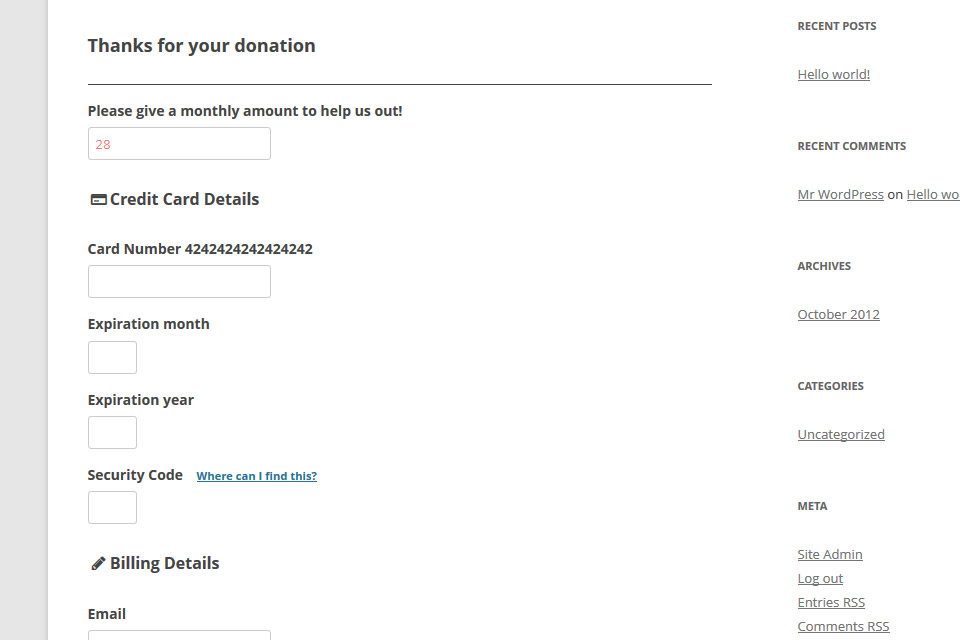
Now that you’ve got your configuration down, head over to the Checkout section. Here you’ll see the form elements on the left side, with a live preview on the right side.
Add or remove any form elements you want on the left, drag and drop to rearrange, and the right side will show you a quick preview. Click “Save to Database” to make the changes permanent.
TIP: Billing Details and Credit Card Details are mandatory blocks and cannot be removed.
Creating Payment Options
ASPE gives you a lot of flexibility on collecting payments. Any checkbox, radio (multiselect) or text input (single line box) can indicate money options.
To collect money via a text box (eg entering a simple money amount), create a text input, check that it is used to collect money. You may enter a default value in the box if you wish. Here, you may also select if the box will accept recurring payment option, or whether to give the payee that option. If you offer a recurring payment, be advised that the plugin will create a plan in your Stripe backend with that amount and a name (eg recurring-55 for $55 dollars).
To collect money via a checkbox (eg adding an option to your checkout form for $40), create a checkbox, check that it is used to collect money, and enter a numerical value in the box. This value will be added to the total checkout amount if the checkbox is checked.
To collect money via a radio (multiselect), add a radio to your form, and in the values you must enter a label:pair value surrounded by pipes (|). For example, to give the user an option between three plans, enter "Gold:100|Silver:45|Basic:24"<!--formatted--> – if the user selects the Silver box, $45 will be added to the total. You may also enter preexisting Stripe plan idshere, such as "Gold:goldplan|Silver:silverplan|Bronze:bronzeplan"<!--formatted--> if those latter items are Stripe plan ids.
TIP: Our plugin will combine all money collectors on a page into the total; for example if you have an input box for any number of donation, and a checkbox to add a package, and a plan selector, the total will include all of them.
Any of the boxes may be required if you desire. You can also add graphical elements such as a horizontal divider, text or paragraphs, or headers. Edit to your hearts desire.
Communication
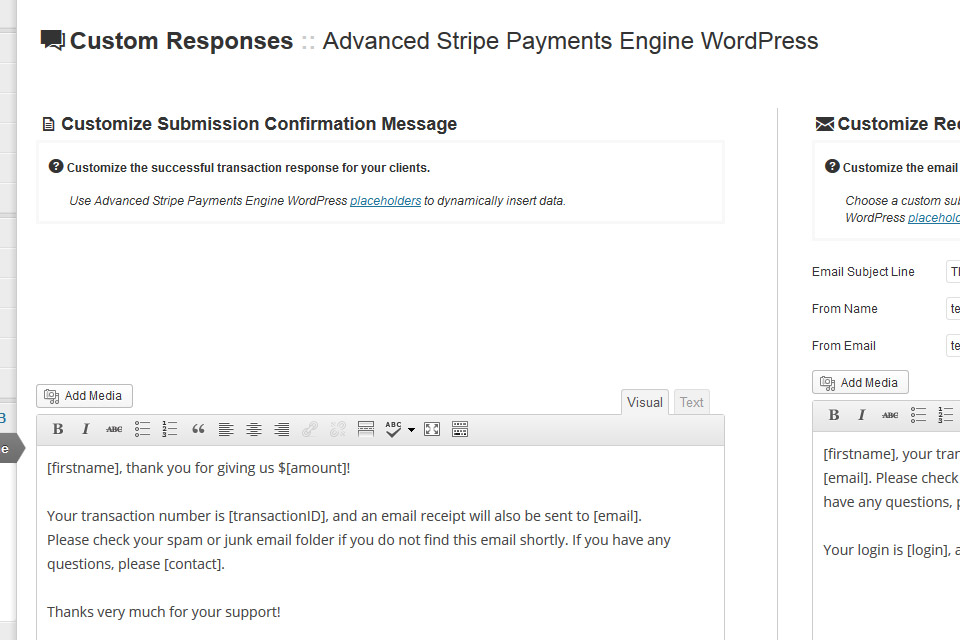
Finally, head over to the Communication tab to see the successful submission text on your left, and the email sent to the payee after a successful submission. You may edit, insert pictures from your WP gallery just as you would any normal WordPress post.
You may also enter placeholders to be filled in after a successful transaction; eg “Thanks for paying us, [firstname]” would be translated to “Thanks for paying us, John” after John Doe pays you. The following placeholder fields are available to you:
transactionID - returns after a successful transaction
customerID - returns after a successful creation of a customer in Stripe
amountdateemailphonefirstnamelastnamecompanycitystateip - replaces with the user's IP address.
<!--formatted-->contact - replaces with a "contact us" text with email link to site administrator.
<!--formatted-->
If you chose to enable the WP user integration, and a new WP user was created upon payment (for example, for a membership site), you may also use the following in both email and successful reply:
[login][password]
TIP: Please note that this is the only time the password will be shown to the user; neither this plugin nor WP stores the password in plain text and the user will subsequently have to reset his or her password as necessary.
Usage
Once you’ve got your plugin set up, head over to your checkout page to edit it. Simply add the
]sinkstripes_form] shortcode wherever you’d like and you’re good to go!
TIP: Developers may use the template tag sinkstripes_output, as in <?php echo sinkstripes_output() ?> wherever they’d like.
History and Reporting
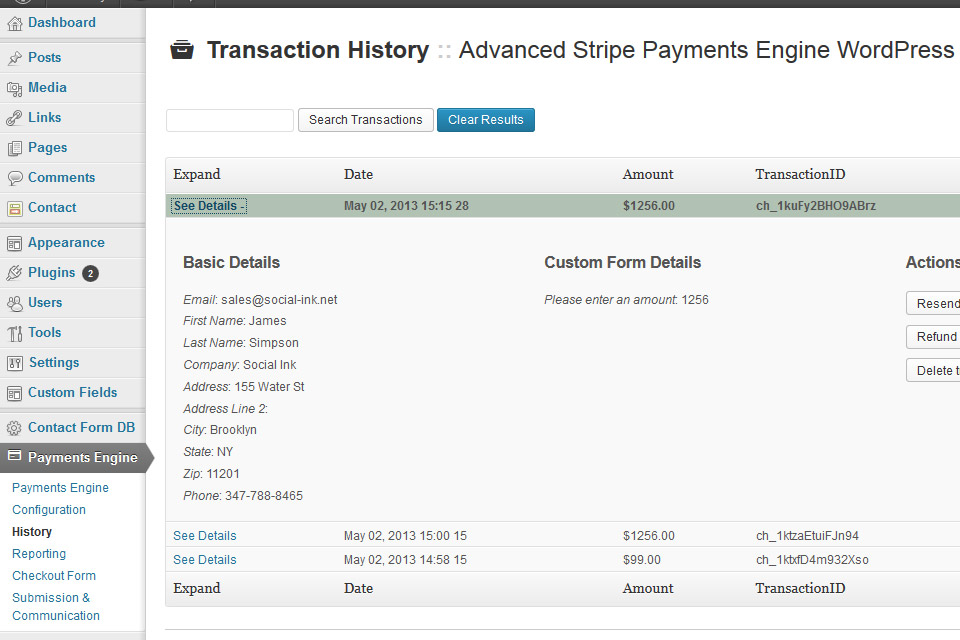
After you’ve got some good payments going, you’ll want to visit the History and Reporting pages, available in the sidebar.
The first, History, allows fine tuned searching and detail views of each transaction. You may also refund transactions or cancel subscriptions via the detail view by clicking on your desired transaction. You can also resend the original receipt email here.
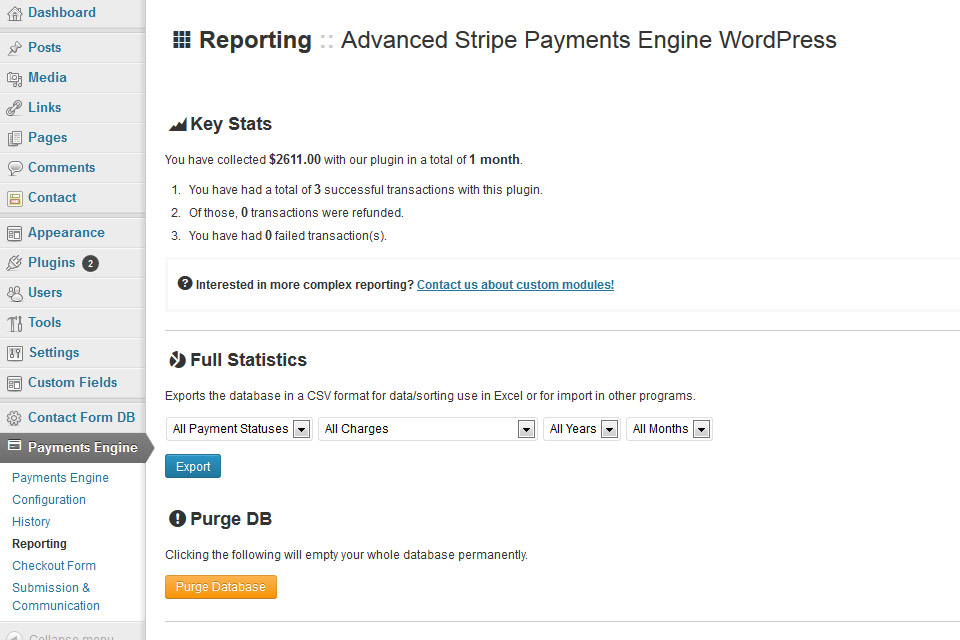
The second, Reporting, allows export to a CSV for sorting. You may select all transactions, or paid/refunded/spam as you desire. If you are looking for more advanced reporting or quantitative analysis, please contact us for custom plugin work!
Advanced Usage
Action Hooks
How do I use action hooks? First, review the WordPress hook codex, which is very helpful.
In our example, we’ll update a db option after each customer is created with the last email.
add_action('sinkstripes_customer_created', 'example_function', 10);

function example_function($transaction_array) {

//save in your email table

update_option('last_customer',$transaction_array['email'];

}<!--formatted-->
Rendering Forms
sinkstripes_form_generated_billing

sinkstripes_form_generated_creditcard

sinkstripes_form_generated_complete
Transactional Action Hooks
sinkstripes_customer_created

sinkstripes_customer_charged

sinkstripes_transaction_saved

sinkstripes_customer_refunded

sinkstripes_transaction_succeeded

sinkstripes_transaction_failed
Email Action Hooks
Fire after a transaction
sinkstripes_send_admin_email

sinkstripes_send_receipt_email
WP User creation
fired after transaction
sinkstripes_wpuser_created
Subscription hooks
Subscribed: fired after transaction and subscribed
sinkstripes_customer_subscribed
Unsubscribed: fired after unsubscribed from backend
sinkstripes_customer_unsubscribed
Filter Hooks
These hooks allow your to change data before it is rendered or saved to the database.
Example: Lets say we want to uppercase all data items before database transfer, for some reason:
add_filter(‘sinkstripes_transaction_details’,’uppercase_names’);
function uppercase_names($insertionArray) {
foreach($insertionArray as $db_column => $value)
$insertionArray[$db_column] = strtoupper($value);return $insertionArray;
}
Layout
Fires before form output
sinkstripes_billing_form_output
Transactional
sinkstripes_transaction_preprocessing

sinkstripes_transaction_details_processed

sinkstripes_transaction_msg_success

sinkstripes_transaction_msg_error
Email
Fires before email are sent; use to modify the email body
sinkstripes_receipt_email_processed

sinkstripes_admin_email_processed
Data Collection Fields
sinkstripes_billing_fields

sinkstripes_billing_notrequired
User creation
Use this to modify the user details before the user is inserted into the db.
sinkstripes_wpuser_details
Subscription
This fires before a custom plan is created; you may modify the name or anything else with this filter.
sinkstripes_subscription_plan_custom